
Heat exchangers allow for the transfer of energy from one medium to another. You can use this transfer of energy for either cooling or heating processes. Today we will be discussing important considerations you need to know when maintaining a shell and tube heat exchanger.
[For info on plate heat exchangers, check out this article]
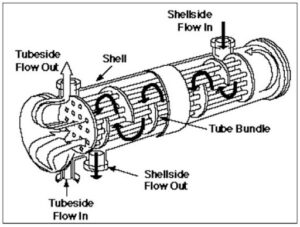
Shell and tube exchangers have a number of tubes mounted inside of a shell. One fluid flows through the tubes (tube side) while the other flows over the outside of the tubes (shell side). Baffles are used on the shell side to increase turbulence, prevent stagnation and improve the heat transfer rate.
Maintenance techniques will vary depending on the fluid being used in the system. When water is in a system for example, you can have different maintenance tasks depending on the mineral content in the water.
Fouling Is The Enemy
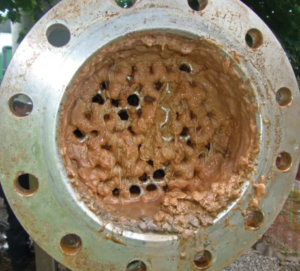
Fouling is the enemy in many heat exchangers. If scale begins to coat the tubes, the efficiency of the unit drops dramatically. Heat transfer deteriorates as fouling gets worse. By watching for an increase in pressure drops or decreases in equipment performance you can spot fouling early.
Fouling can come in many forms. According to CSI Designs, “The most commonly occurring types of fouling and aging in hygienic processing fall into four main types:
- Incrustation: the accumulation of a crust or coating of processed fluids, minerals, or cleaning agents on the surface of heat exchanger parts.
- Scaling: a type of incrustation caused by calcium carbonate, calcium sulfate, and silicates.
- Sediment: comes from corrosion products, metal oxides, silt, alumina, and diatomic organisms (microalgae) and their excrement.
- Biological Growth: Sources of biofouling include bacteria, nematodes, and protozoa.”

Clearing Tube Blockages
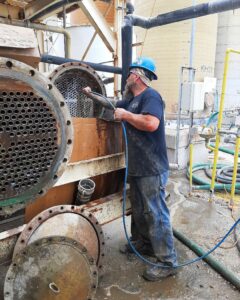
Clearing tubes needs to be performed regularly to ensure efficiency of the unit. Depending on the liquids being used in the shell and tube heat exchanger, the frequency of this cleaning may change.
If slime or algae build up is present, using high pressured water to blast it away may do the trick (AKA hydro blasting). For larger deposits of sludge and tougher buildups it may be necessary to use a mechanical method of cleaning.
This involves wire brushes or the use of scrapers. You may consider “rodding” as form of cleaning on smaller heat exchangers. When you use a mechanical cleaning method, you need to be careful not to damage any of the tubes through excessive force.
Finally, if deposits are stubborn, then use detergents or chemical cleaners. When you use chemicals it is important to remember to ensure the chemical is compatible with the tubes it is cleaning.
The Visual Inspection
Following cleaning of the tubes, visually inspect for signs of leaks, cracks or corrosion in the system. Using a dye is a common way to spot leaks in the system. You can also spot leaks by pressurizing the shell side of the system. This will push air through tubes where leaks are present.
If sacrificial anodes are in use, be sure to inspect these plates during the visual inspection as well. A good rule of thumb is that if over 50% of the plate is eaten away you should replace it.
Repairing Leaks
Leaks can occur for a number of reasons and can cause cross contamination of fluids. Thermal fatigue is often a causes and results when there is extreme temperature differential in the shell and tubes. Below are a few ways we can fix leaks in shell and tube heat exchangers.
Tube and Tube Sheet Repair
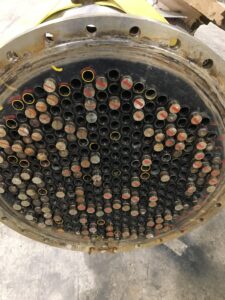

An example of excessive plugging
When the tube has its seal to the tube sheet come loose, you can start by trying to re-roll the tube. If that is not an option due to expansion limits, beading or welding may be necessary. If leaks are found on the tube sheet itself, welding is usually required to fix the issue.
Plugging Tubes
By plugging a tube, you can prevent leakage from affecting the rest of the system. This does however change the overall flow rate and decreases the efficiency of the system. This can be a good temporary fix, but you should always try and limit the use of plugs in your system.
Re-Tubing
As tubes age, it may make sense to remove old tubes and replace them with new ones. This will however require the unit to be down for an extended period of time.
Shell And Tube Heat Exchanger Maintenance Checklist
- Depressurize the unit
- Cleaning out the headers and scrape down tube sheets
- Clear tubes of any blockages (this may also entail the use of acids, high pressure water, drill rods, scrapers, calcite cleaners or scale remover)
- Visually check for leaks
- Replace gaskets
- Verify pressure gauge and thermometer accuracy
- Check and clean strainers if present.
- Check operating safety devices
- Clean exterior surfaces as needed
- Verify operation of Sump Tank
- Tighten all mechanical connections to recommended torques
Advantages and Disadvantages
According to an article written by Savree, the advantages and disadvantages as compared to a plate and frame heat exchanger are as follows:
Advantages
- Cheap compared to plate heat exchangers.
- Relatively simple design and easy to maintain.
- Suitable for higher pressures and temperatures compared to plate heat exchangers.
- Pressure drop (delta P/ΔP) is less than a plate heat exchanger.
- Easy to find and isolate leaking tubes.
- Tubes can be ‘double walled’ to reduce the likelihood of the shell side fluid leaking into the tube side fluid (or vice versa).
- Easy to install sacrificial anodes.
- Do not foul as easily as plate heat exchangers.
Disadvantages
- Less efficient than plate heat exchangers.
- Require more space to open and remove tubes.
- Cooling capacity can not be increased, but a plate heat exchanger’s can be.
ABOUT US
Rasmussen Mechanical Services is an industry leader; a full-service, one-stop-shop for all things mechanical services.
With 10 departments, 7 locations, and over 200 employees, Rasmussen Mechanical has wide-ranging expertise in commercial, industrial, and institutional mechanical equipment.
